The 15-Minute Wall Pilates Interval Workout for Beginners
By Simple HIIT Timer Team · November 19, 2026
Wall Pilates has taken the fitness world by storm, and for good reason. By using a simple, blank wall as your primary piece of equipment, you can mimic the resistance and support traditionally provided by a Pilates reformer machine. This makes the practice highly accessible for anyone exercising at home. However, one of the biggest challenges when practicing at home is maintaining the slow, deliberate pace that makes Pilates effective. That is exactly where a wall pilates timer comes into play.
When you count repetitions, the natural tendency is to speed up as your muscles begin to fatigue. Rushing through Pilates movements removes the tension from the targeted muscles and shifts the load to your joints and momentum. By setting a strict interval for work and rest, you remove the temptation to race to the finish line. You can close your eyes, focus entirely on your breathing, and prioritize the quality of your movement over the quantity of your repetitions.
Why You Should Use an Interval Timer for Wall Pilates
Traditional Pilates emphasizes the mind-body connection, requiring intense concentration on how your muscles engage and how your spine articulates. Using an exercise timer allows you to dedicate a specific block of time to each movement. For this routine, we use a work-to-rest ratio of 40 seconds of work followed by 20 seconds of rest.
Forty seconds of continuous, controlled movement is the perfect amount of time to complete six to eight high-quality repetitions. It keeps the muscles under tension long enough to stimulate endurance and strength adaptations. The 20-second rest period is equally important. In a wall-based routine, you frequently need to change your orientation—moving from lying on your back to facing the wall, or standing up. Twenty seconds provides just enough time to transition safely and set up your posture for the next exercise without feeling rushed.
The 15-Minute Wall Pilates Timer Workout
To complete this workout, you only need three things: a blank wall, a comfortable exercise mat, and a timer. You will perform five different exercises. Each exercise is performed for 40 seconds, followed by 20 seconds of rest. You will complete three total rounds of this five-movement circuit, resulting in a highly effective 15-minute workout.
1. The Wall Bridge
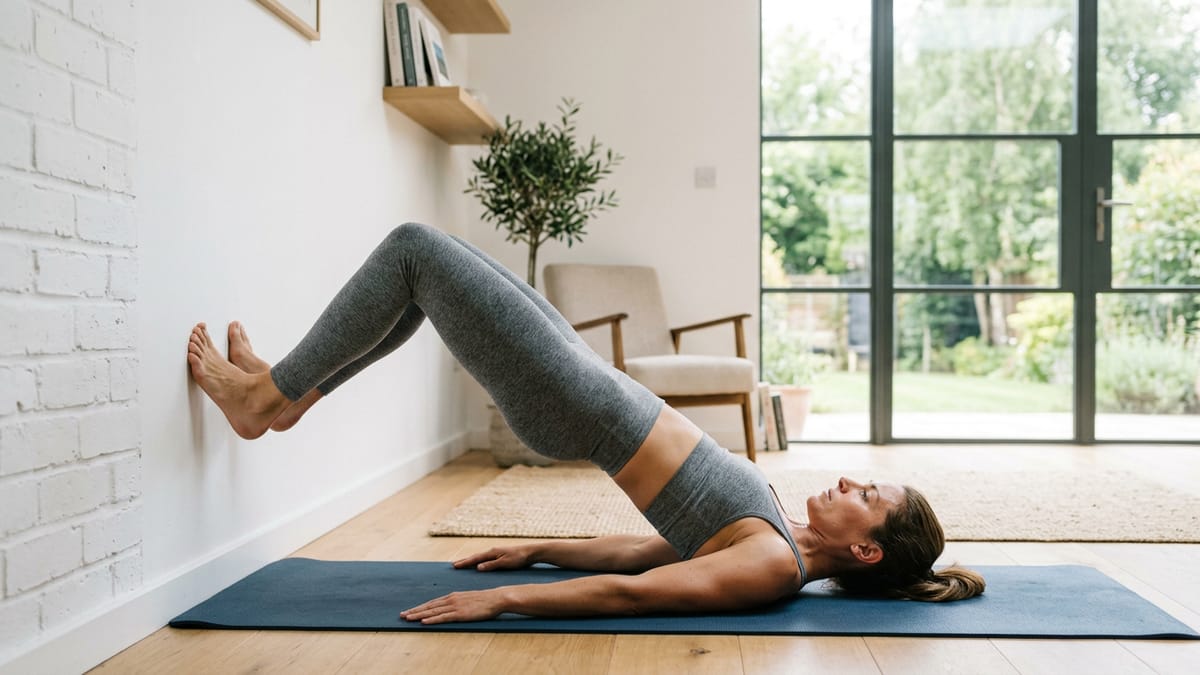
Lie flat on your back with your knees bent and your feet resting flat against the wall. Your shins should be parallel to the floor, creating a 90-degree angle at your knees and hips. Rest your arms at your sides with your palms facing down. Engage your core by drawing your belly button toward your spine. Press your feet into the wall and slowly peel your spine off the floor, starting from your tailbone and moving up one vertebra at a time until your body forms a straight line from your shoulders to your knees. Hold this top position for two seconds, squeezing your glutes. Slowly lower your spine back to the mat, reversing the movement. Using a timer set for 40 seconds ensures you do not rush this articulation. Aim for continuous, fluid movement.
2. The Wall-Supported Plank
Begin on your hands and knees, facing away from the wall. Carefully step your feet backward so that the soles of your feet press flat against the baseboard or lower wall. Your hands should be directly under your shoulders, and your body should form a straight, rigid line from your head to your heels. Draw your abdominal muscles inward and upward. Press the floor away with your hands to keep your shoulder blades stable. Hold this position, focusing on taking deep, lateral breaths into your ribcage. The wall provides sensory feedback, forcing you to push backward through your heels, which actively engages your leg muscles and takes unnecessary pressure off your wrists. Hold the tension steady for the entire 40-second work interval, lowering to your knees only if your lower back begins to sag.
3. Wall Sit with Heel Lifts
Stand with your back flat against the wall and your feet hip-width apart, about two feet away from the baseboard. Slide your back down the wall until your thighs are parallel to the floor, as if you are sitting in an invisible chair. Ensure your knees are directly above your ankles, not extending past your toes. Press your lower back firmly into the wall to engage your core. Once you are stable, slowly lift both heels off the floor, rising onto the balls of your feet. Hold the lift for one second, then lower your heels back to the floor with control. The constant tension of the wall sit combined with the calf raise turns this into a highly demanding lower-body exercise. Breathe steadily, inhaling as you lower your heels and exhaling as you lift them.
4. The Wall Teaser
Lie on your back facing the wall. Extend your legs straight up so the backs of your heels rest against the wall. Your body should form an L-shape. Extend your arms straight back overhead, resting them on the floor. Take a deep inhale. As you exhale, nod your chin to your chest, engage your abdominals, and slowly roll your upper body off the floor, reaching your hands toward your toes. The wall provides a stable anchor for your legs, allowing you to isolate your abdominal muscles more effectively than a standard sit-up. Once you reach as high as you can without using momentum, pause for a moment. Inhale as you slowly roll your spine back down to the starting position. Repeat this controlled rolling motion for the duration of the interval.
5. Standing Wall Push-Ups
Stand facing the wall, about an arm's length away. Place your hands flat against the wall at shoulder height, slightly wider than shoulder-width apart. Keep your feet together and your body in a straight line from your head to your heels. Engage your core and squeeze your glutes to maintain a rigid posture. Slowly bend your elbows to lower your chest toward the wall. Keep your elbows pointing slightly downward, rather than flaring them out strictly to the sides. Once your nose is close to the wall, press through your palms to extend your arms and return to the starting position. Because this is a standing variation, the 40-second interval allows you to focus heavily on the mind-muscle connection in your chest and triceps without the overwhelming fatigue of a floor push-up.
How to Progress Your Wall Pilates Practice
Once you master the basic 15-minute routine, you can easily increase the difficulty without learning new exercises. The simplest way to progress is by adjusting your time intervals. You can navigate to a workout timer and increase the work period to 50 seconds while reducing the rest period to 10 seconds. This demands greater muscular endurance and cardiovascular stamina.
Alternatively, you can increase the intensity of the movements themselves. During the wall bridge, try extending one leg straight up toward the ceiling while pressing the other foot into the wall. During the wall sit, hold a pair of light dumbbells or water bottles to add resistance. The beauty of timed workouts is that you can scale the difficulty internally by simply contracting your muscles harder and moving with even more precision.
Safety and Setup Tips
Before beginning any new exercise routine, it is important to clear the space around you to avoid injury. Make sure the wall you choose is free of picture frames, shelves, or fragile items. When doing wall Pilates, traction is vital. Sweaty feet can easily slip against a painted wall, which could lead to a strained muscle or a fall. It is highly recommended to wear specialized grip socks with rubber treads on the bottom, or simply perform the routine barefoot to maximize your stability.
Always spend three to five minutes warming up your body before starting the timer. Simple movements like arm circles, torso twists, and gentle toe touches will increase blood flow to your muscles and prepare your joints for the workout. If you experience any sharp pain in your lower back or knees during the exercises, stop immediately. Those with pre-existing injuries or medical conditions, as well as those who are pregnant, should consult with a doctor or a certified physical therapist before starting a wall Pilates program.
Frequently asked questions
Can you lose weight doing wall Pilates?
Wall Pilates can support weight loss by building lean muscle, which slightly increases your resting metabolic rate. However, for significant weight loss, it should be paired with a balanced diet and regular cardiovascular exercise.
How often should I do a wall Pilates routine?
Aim for three to four sessions per week. This provides enough frequency to build core strength and flexibility while giving your muscles adequate time to recover between workouts.
Do I need shoes for wall Pilates?
It is best to perform wall Pilates barefoot or while wearing grip socks. Shoes are often too clunky for the precise foot articulation required, and regular socks will cause you to slip against the wall.
Use this timer
Start the Full body: 40s / 20s timer — 40s work / 20s rest × 10 rounds. It runs in your browser with sound cues, and there is nothing to install.